Overview
You use an application token to make a call that doesn't involve a registered user. Pass a user token when an API endpoint refers to a specific end-user. You will pass these credentials to Yodlee as a bearer token in an Authorization header for the RESTful APIs.
JWTs are signed using an RSA public/private key pair. Each Yodlee environment (Sandbox, Development, and Production) requires different keys for signing. You can read more about Yodlee environments here.
Note that web tokens must expire after 30 minutes.
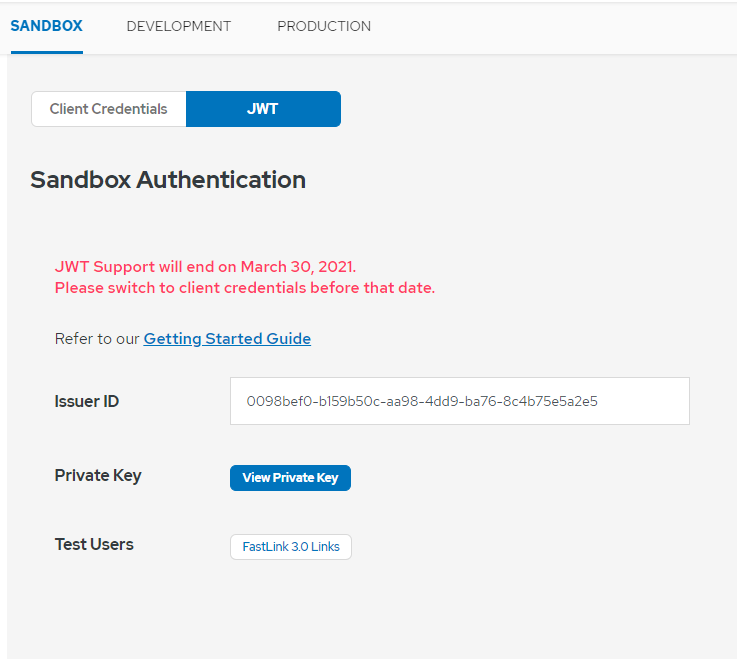
Sandbox Environment
In the sandbox environment, Yodlee provides your private key, holds the public key on your behalf, and uses it to create an issuer ID. You will also find a fixed set of end-user IDs. Your private key, your issuer ID, and the test user IDs can be seen on your API Dashboard page.
Your issuer ID acts as an API key. You will always include your issuer ID in the token payload when creating JWTs. Add a user id to the payload when creating user tokens.
Development and Production Environments
When you move to your development and production environments, you will need to generate RSA key pairs in the PKCS#8 format, using a key size of 2048 bits. You will provide your RSA public key to Yodlee by uploading it from your API Dashboard page.
You can find sites that generate RSA key pairs by doing a web search for “generate RSA key pair”. One such site, also helpful in testing, is http://travistidwell.com/jsencrypt/demo/. Once you have your key pair, you will use your private key to sign the JWT tokens. Use the “RS512” algorithm to sign your tokens.
Keep your RSA private keys confidential and safe. A private key should, for example, never be included in a mobile application.
Sample Request with JWT as a Bearer Token in the Authorization Header
Here we see an example HTTP request method and headers for a typical API call.
GET /ysl/accounts?
HTTP/1.1
Host: sandbox.api.yodlee.com
Content-Type: application/json
Api-Version: 1.1
Authorization: Bearer  eyJhbGciOiJSUzUxMiIsInR5cCI6IkpXVCJ9.eyJpc3MiOiIyYjMwZjY2Mi0xN2E1LTRlYjQtOGI1Ny00NWM2YmVmM2Q0YmMiLCJpYXQiOjE1NTAyNjY5ODEsImV4cCI6MTU1MDI2Nzg4MSwic3ViIjoic2JNZW01YzU0OWIxOGVlNDczMSJ9.KNRcrqzocGQyeR1U-wm0p3oDtEuGUZR09XP6FKjtrxbgJI_75JzmeEyAY1DclULe4_3mVEWPR0IagLt5_UvGHs1Ztx94WRnLxBadGyfzuute5kyRG1Zugj_8Yq2YMeyke8wGYHIgLVHdNozc2LPqzeYE-swD5wCrM8daGxSW7SI9jTEW9vzemHKCDVRgMIWTt12eCZKuYJHmD5IXT3RNLHUs4Z3PjISgNZxYomCWSb9MskcI-kQ5UcWiyY6BM_03kS8YPcY_wan-Fus-JzBTbOQVb3H0VtCBAj4n89K0WXMgPbQnv-USigZ6IyZdvORn3mTIEyn8EUy0-mzxXRMIBg
cache-control: no-cache
The authorization header should indicate you're using a bearer token. The token itself follows on the same line.
Types of JSON Web Tokens (JWTs)
There are two types of JWTs used in the Yodlee API. Both types of tokens need to be created within your application code and passed to Yodlee via APIs.
- Application Token - Used to access resources that are not specific to a user like the list of providers that Yodlee offers or to create a new user.
- User Token - Used to access resources that are specific to the user like adding and retrieving account/transaction data on behalf of the user. This will be the most common type of token and will be used extensively in your implementation.
Creating an Application JWT
The header of the JWT will contain the algorithm and token type.
{ "alg": "RS512", "typ": "JWT" }Yodlee requires the RS512 algorithm. See RFC7518 "JSON Web Algorithms" for details.
The payload of the JWT will contain the following fields:
{ "iss": "98cc4a8a-2d89-4d02-90da-721ed0d4edb5", "iat": 1545932950, "exp": 1545934750 }- iss = Issuer Id
- iat = The epoch time the token is issued.
- exp = The epoch time the token expires. You should set it to 30 minutes or 1800 seconds from iat.
You will find your Issuer Id listed on your API Dashboard.
The header and payload will be signed using your private key. The resulting token will look like this:
eyJhbGciOiJSUzUxMiIsInR5cCI6IkpXVCJ9.eyJpc3MiOiI5OGNjNGE4YS0yZDg5LTRkMDItOTBkYS03MjFlZDBkNGVkYjUiLCJpYXQiOjE1NDU5MzM4NTAsImV4cCI6MTU0NTkzNDc1MH0.HV5H_uwds0snTUxgbFKaB2mvz7j5W4-UBSc7RI7ZfcW7oEluVnr-taZxgU1aU-2xEAeUEtmyKx3DlxmgA8MXEmpgqgr3CzybZF3IvutEULNTmZNIdwxDSBkEh8-mSOL56GLIYLdhbjDqDqfXbF21acIoxQPtJu9j63JjrSIG45aAosFHg-LmbpHpsLscXtTRvZ7spTquV-5hTrE8aaYr1DUYyMult0NhQwLamufeEVACudmWBVR4HRfZTUZFFRLFXqnzE60Tvy8S72XMA6vv-1_s5LJoxfdonIbNvhgHMRwqOodkLkc1cyc8flGeCIR892sCYx4cQldpEdV9bLH_YAThis is the encoded form of the JWT passed in the Authorization header of the API request.
Code Example
The following example creates and prints a token to the console. It's written for use with node.js. It relies on the jsonwebtoken package. In general you should use well-vetted cryptography packages, whatever your programming language of choice is.
'use strict'; const path = require('path'); const fs = require('fs'); var jwt = require('jsonwebtoken'); var privateKey = fs.readFileSync("./devSandbox.key","utf8"); //Location of the file with your private key var payload = {}; var currentTime = Math.floor(Date.now() / 1000); var signOptions = { algorithm: "RS512" //Yodlee requires RS512 algorithm when encoding JWT }; payload.iss = "adf50bf3-8b0f-479d-962d-4031ebadac9a"; // The Issuer Id from the API Dashboard payload.iat = currentTime; //Epoch time when token is issued in seconds payload.exp = currentTime + 1800; //Epoch time when token is set to expire. Must be 1800 seconds var token = jwt.sign(payload, privateKey, signOptions); console.log("Printing token: "+ token);The output should be an encoded JWT similar to the example shown above.
Creating a User JWT
The process to create a user JWT is the same as above with the exception that the payload of a user JWT requires a “sub” (subject) parameter. The “sub” parameter will contain the unique id of a user. In the Sandbox environment, Yodlee provides five pre-registered users with test data already available in the “View Test Users” button. This sample includes a typical Sandbox user id. After generating a user JWT for Sandbox, you can retrieve account data with the GET /accounts API.
The payload for a user JWT will contain entries like this:
{ "iss": "98cc4a8a-2d89-4d02-90da-721ed0d4edb5", "iat": 1545932950, "exp": 1545934750, "sub": "sbMem5c3418773ef071" }Code Example
This example creates and prints a user token to the console.
'use strict'; const path = require('path'); const fs = require('fs'); var jwt = require('jsonwebtoken'); var privateKey = fs.readFileSync("./devSandbox.key","utf8"); var payload = {}; var currentTime = Math.floor(Date.now() / 1000); var signOptions = { algorithm: "RS512" }; payload.iss = "adf50bf3-8b0f-479d-962d-4031ebadac9a"; // The Issuer Id from the API Dashboard payload.iat = currentTime; payload.exp = currentTime + 1800; var token = jwt.sign(payload, privateKey, signOptions); console.log("Printing token: "+ token);Further Resources
You can find more information about JWTs at https://jwt.io/introduction/.
You can find a repository of code examples for generating JWTs in different languages here.