Open Banking Integration
US Open Banking Integration
Introduction to US Open Banking
Open Banking (OB) is a new data-sharing approach in the United States that allows users to authenticate via OAuth and grant their permission to share their financial data with authorized data recipients. The information is shared on a read-only basis through Application Programming Interfaces (APIs). For details about the dataset concept used in the OB Yodlee API integration, refer to Working with Datasets.
You can now use Yodlee APIs v1.1 to link or update the accounts held with financial institutions (FIs) that support Open Banking. In this process, you can either identify Open Banking providers or migrate the user's accounts from the credential-based provider(s) to the Open Banking providers. For all these open banking providers, you can redirect the user to the FI's login page for authentication.
Add an Open Banking Account
To add an OB provider account, the user must search and select the site first. The user is then required to provide consent to share account information via Yodlee APIs.
API Flow: Click to view the Adding an Open Banking Account Flow.
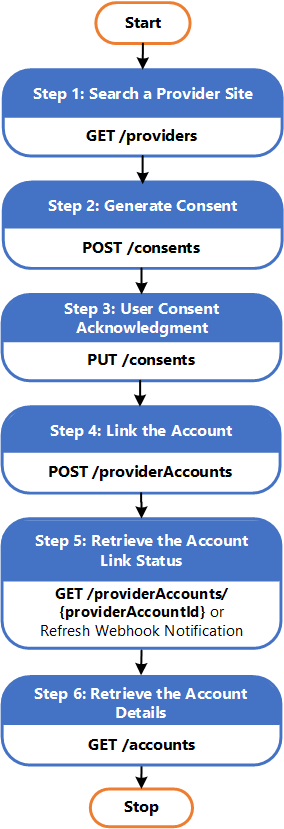
Step 1: Search for a Provider Site
Call the GET /providers or the GET /providers/{providerId} endpoint to retrieve information about all the providers or a specific provider. For the Open Banking providers, the attribute authType will be OAUTH.
Step 2: Generate Consent
Call the POST /consents endpoint to provide transparency on the data that is retrieved from the FI site. You can use this API to provide the text that needs to be displayed to the users to confirm their intent to consent.
Step 3: User Consent Acknowledgment
Pass the scopeId and the consentId in the PUT /consents/{consentId} endpoint to confirm the user's acknowledgment. Yodlee will return the authorizationUrl in the response to redirect the user to the FI site to complete the authentication.
Step 4: Link the Account
Once the user completes the authorisation procedure, obtain the authorizationCode present in the redirect URL. Call the POST /providerAccounts endpoint to link the user's accounts with the Open Banking provider. Provide the generated consent ID for the provider site and the authorization code received from the bank. The link account process is asynchronous; use webhooks or polling APIs to learn the progress of the request.
Step 5: Retrieve the Account Link Status
Call the GET /providerAccounts/{providerAccountId} endpoint to retrieve the status of the accounts linked from the Open Banking provider.
Step 6: Retrieve the Account Details
Once the link account process is complete, call the GET /accounts or the GET /accounts/{accountId} endpoint to retrieve the account details of all the accounts that were added from the Open Banking provider.
Open Banking Migration
Open Banking migration refers to the process of migrating the existing (non-open banking or non-OB) credential-based user logins and associated accounts to the new Open Banking (OB) user logins.
Migration in Runway Period
Runway period is the duration decided by the customer and Yodlee to perform the migration process for a given Open Banking provider site.
- Before the runway period: The credential-based site works as usual.
- During the runway period: At the start of the runway period, the new Open Banking site is available in search, and the credential-based site is no longer available. Any new account additions will be part of the Open Banking site. Old accounts added under the credential-based provider site need to be newly authorized. During authorization, they will be upgraded to Open Banking. During the runway period, the accounts will continue to get refreshed regardless of whether the accounts are authorized or not.
- After the runway period: The accounts will be automatically migrated to the Open Banking provider and will need authorization before any further refreshes can occur.
During the Open Banking data migration, two or more provider accounts may merge into one provider account ID. After the migration is complete, details of these provider account IDs are returned in the following two identifiers of the GET /dataExtracts/userData API response:sourceProviderAccountIdsanddestinationProviderAccountId.
Once the data migration is complete, thedestinationProviderAccountIdattribute (i.e., the retained provider account ID) will have an entity consisting of all thesourceProviderAccountIdsfrom where the data was migrated. The provider account IDs that were the source will be deleted and will only have thedestinationProviderAccountIdattribute where the data was migrated.
API Flow: Click to view the Open Banking Migration Flow.
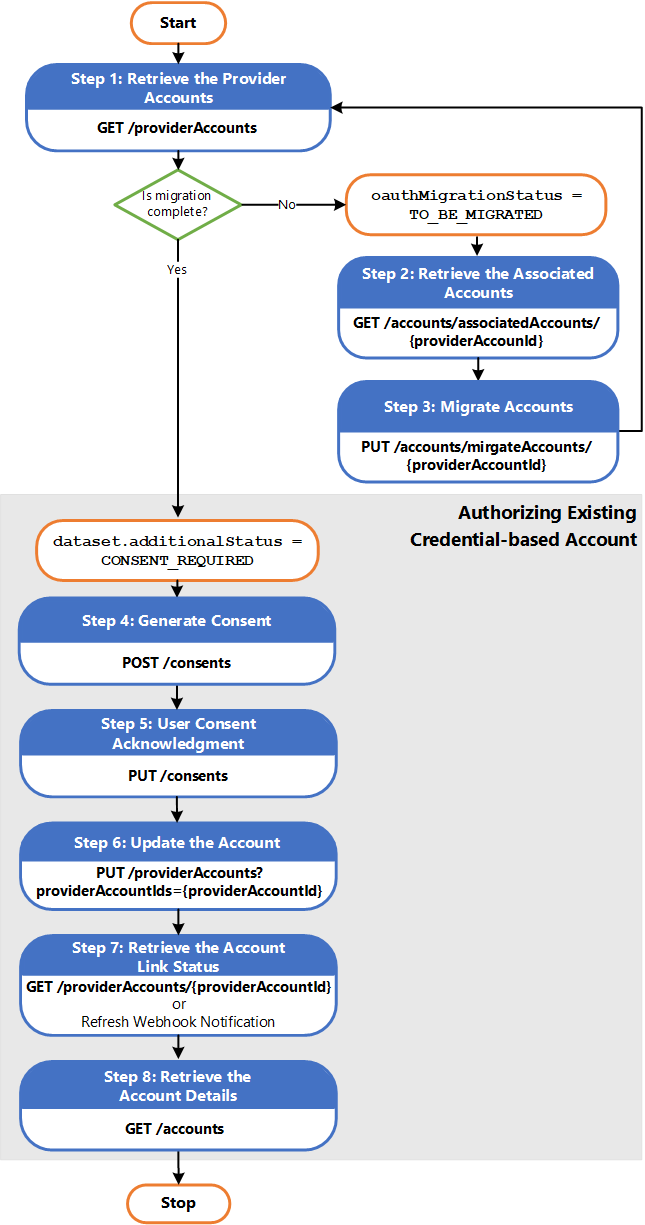
Step 1: Retrieve the Provider Accounts
Call the GET /providerAccounts endpoint to retrieve the provider accounts.
- Continue to Step 2, if
oauthMigrationStatusisTO_BE_MIGRATEDindicating the providerAccounts are eligible for Open Banking migration. - Skip to Step 4, if
dataset.additionalStatusisCONSENT_REQUIREDindicating the providerAccounts are migrated to Open Banking and now requires user consent.
Step 2: Retrieve the Associated Accounts
As part of the OB solution, financial institutions may merge their subsidiaries and provide data as a single OB provider. Before the OB solution, this data was aggregated through different provider IDs. Call the GET /accounts/associatedAccounts/{providerAccounId} endpoint to retrieve all the associated accounts/providerAccounts through any of the associated providerAccountIds that belong to the subsidiary of the financial institution.
Step 3: Migrate Accounts
Call the PUT /accounts/migrateAccounts/{providerAccountId} endpoint and pass the user's consent acceptance to initiate account migration process. Invoking this service indicates that the user has given consent to access the associated account information from the financial institution. Start with Step 1 after the migration is complete.
Authorizing Existing Credential-based Account
Step 4: Generate Consent
Call the POST /consents endpoint to provide transparency on the data that is retrieved from the FI site. You can use this API to provide the text that needs to be displayed to the users to confirm their intent to consent.
Step 5: User Consent Acknowledgment
Pass the scopeId and the consentId in the PUT /consents/{consentId} endpoint to confirm the user's acknowledgment. Yodlee will return the authorizationUrl in the response to redirect the user to the FI site to complete the authentication.
Step 6: Update the Account
Call PUT /providerAccounts?providerAccountIds={providerAccountId} to update the user's accounts with the Open Banking provider. Provide the generated consentId for the provider site and the authorization code received from the bank. The update account process is asynchronous; use webhooks or polling APIs to learn the progress of the request.
Step 7: Retrieve the Account Link Status
Call the GET /providerAccounts/{providerAccountId} endpoint to retrieve the status of the accounts linked from the Open Banking provider.
Step 8: Retrieve the Account Details
Once the link account process is complete, call the GET /accounts or the GET /accounts/{accountId} endpoint to retrieve the account details of all the accounts that were added from the Open Banking provider.
Best Practices
- Track the request using the
stateparameter to map the user to request to provider combination. - Display the list of accounts to the user that is part of the provider account and is in
CONSENT_REQUIREDstatus, and suggest the user to select all the accounts in the Open Banking provider site. - Pass datasets while calling the POST /consents and the PUT /consents endpoints only if you want to change the default dataset configurations.
- Once the
consentIdis generated using the POST /consents endpoint, link it to aproviderAccountIdfor that user. If not done, you will get the sameconsentIdfor the user and provider combination. - If the user is editing a consent for an existing
providerAccount, always call the PUT /providerAccounts endpoint with the updatedconsentId. Calling the POST /providerAccounts endpoint with the sameconsentIdwill throw an invalid value for consent ID.
UK Open Banking Integration
Introduction to UK Open Banking
Open Banking (OB) is a new financial directive in the EU and the UK starting from September 2019. Under OB, users have the right to grant or withhold their permission to share their account data with authorised third-party providers (TPP) such as Yodlee. It enables customers to use TPP to help manage their finances. The data is shared via Application Programming Interfaces (APIs).
Yodlee API v1.1 supports linking accounts held with financial institutions that support OB. Third-party developers who want to add online OB enrolment to their application can use Yodlee APIs to manage the user’s account data sharing permissions. For details about the dataset concept used in the OB Yodlee API integration, refer to Working with Datasets.
Customer Onboarding to Open Banking
To onboard onto the Yodlee Open Banking solution, customers will have to perform the following steps:
- Sign up for a Yodlee Developer Account, and be on the Launch pricing tier or above.
- Name Yodlee as your Account Information Service Provider (AISP) in your FCA application.
- Apply and get the company approved by the Financial Conduct Authority.
- Enroll in the Open Banking Directory
- Contact customer service to migrate credential-based accounts to the Open Banking site.
Yodlee will move the accounts belonging to a container (bank/card) from screen-scraping to Open Banking. - Launch the application configuration process by clicking the Open Banking banner on the Dashboard page. Perform the following steps:
- Generate and download the unsigned certificate.
- Once signed at Open Banking, upload the certificate to complete the application configuration process.
- To view the Open Banking configured sites, click Site Config in the Dashboard page.
Click Add Manual Site to register a manual site.
Only one application is allowed per environment. Customers can only switch the redirect URLs, provided there are multiple URLs present in Software Statement Assertion (SSA). To make any more updates to the application configuration, the customer has to delete the current application and register a new one. The successful creation of the application will automatically trigger the dynamic site migration process.
API References
- Consents
- Generate consent – In the add account flow, the POST /consents endpoint is used to provide transparency to the end-user on the data that will be shared by them. It is used to come up with text that can be displayed as intent to consent.
- Update user consent – The PUT /consents/{consentId} endpoint is used to capture the acceptance of the consent presented to the user. The endpoint will return the authorization redirect URL that should be used to present the bank’s interface to the user for authentication.
- Get Consent – The GET /consents endpoint is used to retrieve all the consents submitted to Yodlee. It can be used in building interface for managing consents or build a consent dashboard to implement flows like consent renewal and revoking consent.
- Institutions – The GET /institutions endpoint is used to identify credential-based aggregation sites and related Open Baking sites in a financial institution. The service searches for an institution regardless of the authentication types associated with the providers.
Adding an Account
To add an OB provider account, the user will have to search and select the site first. The user is then required to provide consent to share account information via Yodlee APIs.
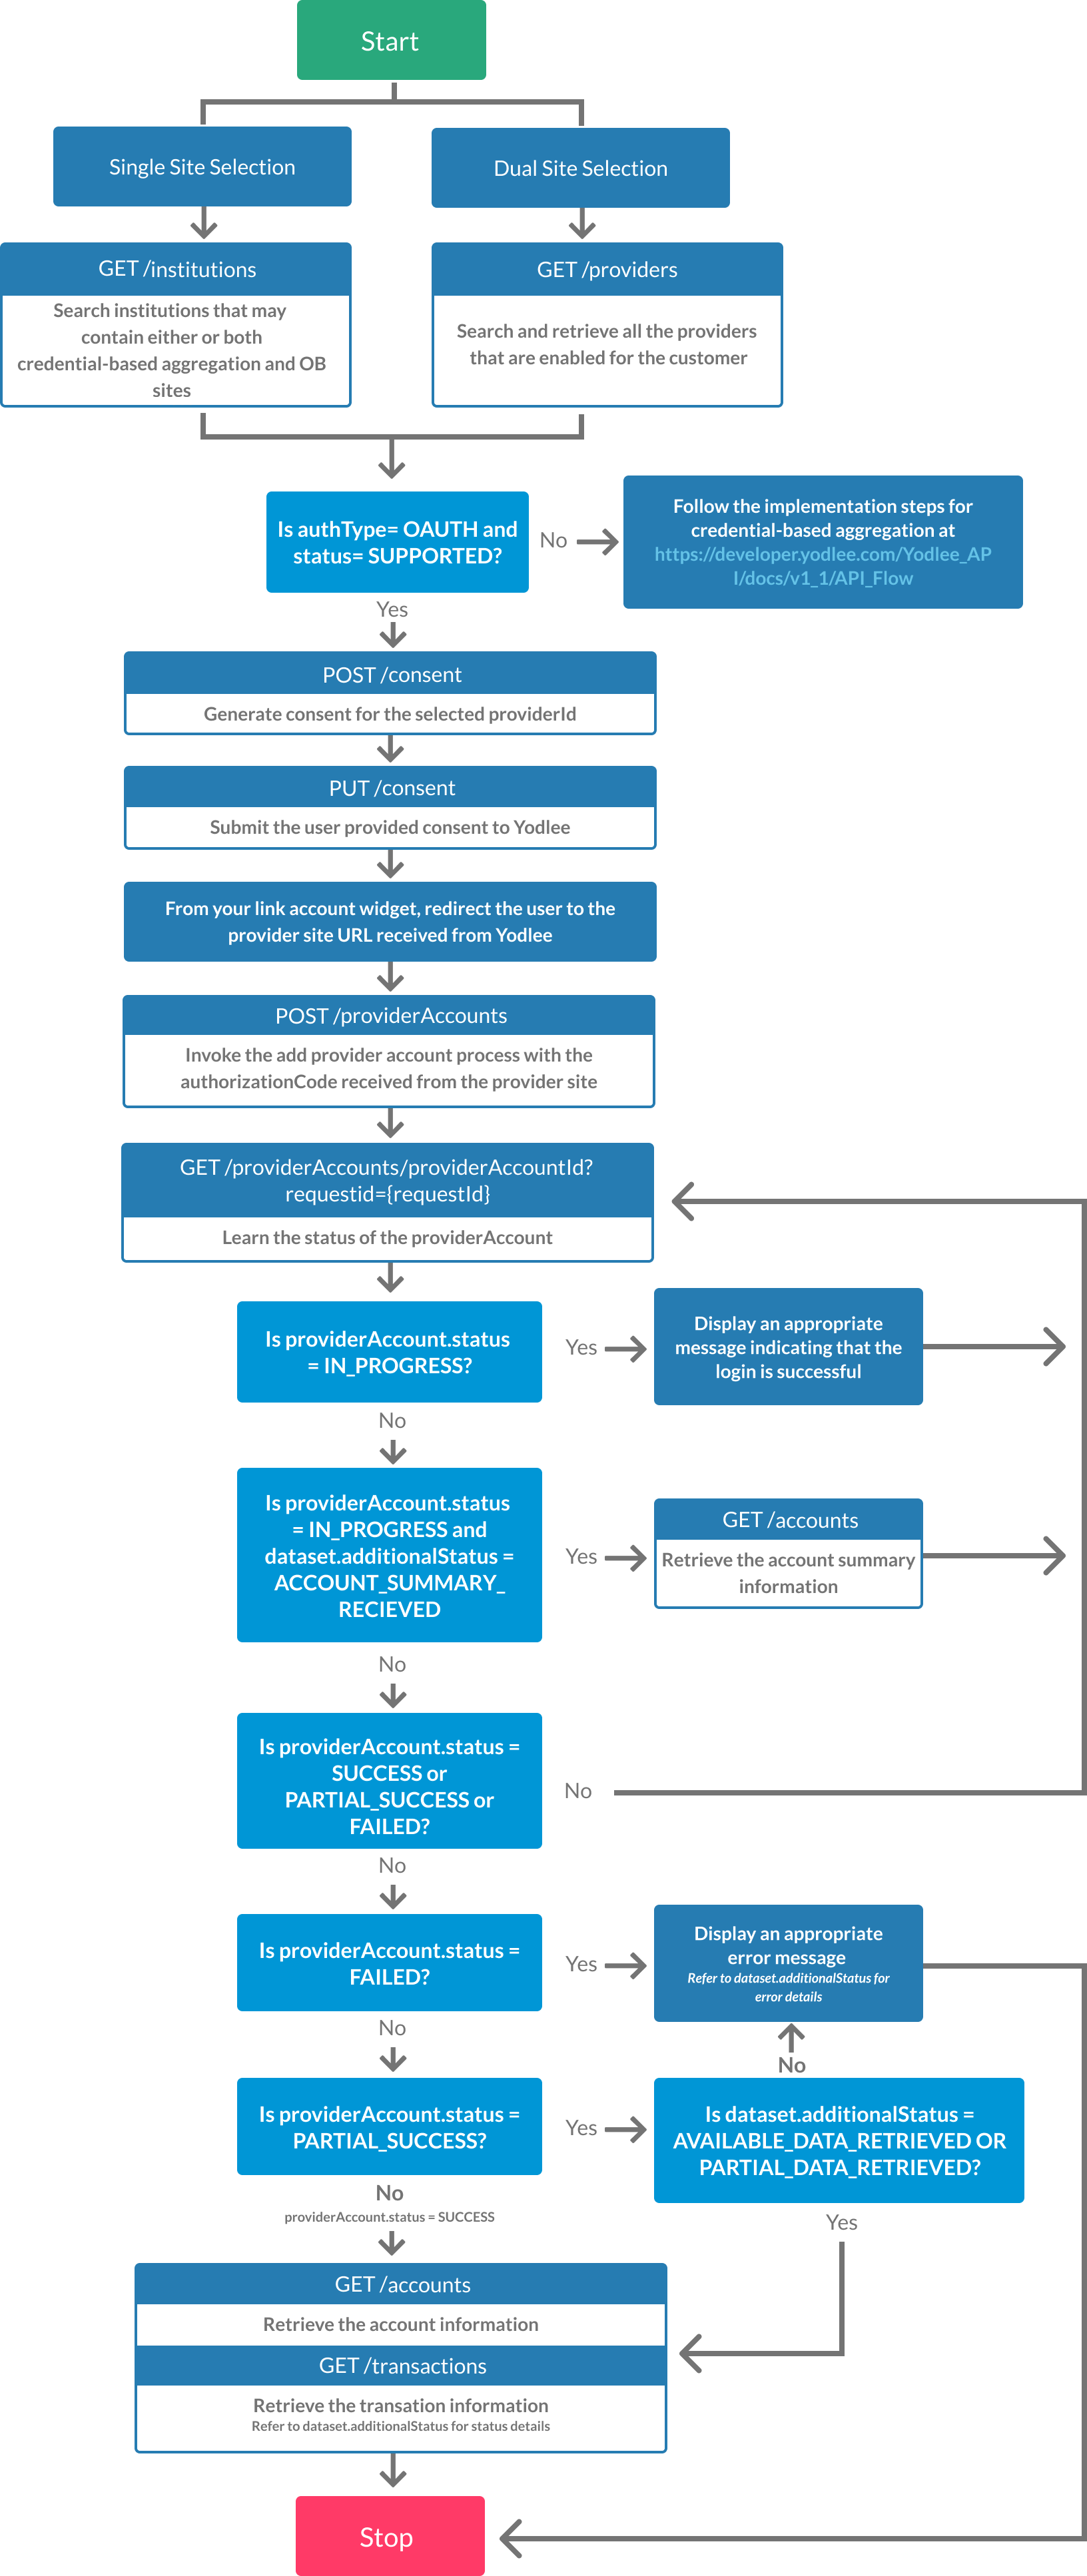
Step 1: Search for the Provider Site
- Single-site selection – Call the GET /institutions endpoint to retrieve institutions that may contain either or both credential-based aggregation and OB sites.
Single-site selection is defined to be displaying just one link for the financial institution (supporting both the account types) but providing options to the user to select the account type to be aggregated. On selecting the site, the user will be allowed to choose from different account types - at present, only Current accounts are aggregated with Open Banking and all the other account types are aggregated using the user's banking credentials.
Follow the implementation flow to add credential-based accounts in Link or Update Account API Implementation Flow Charts. - Dual-site selection – Call the GET /providers endpoint to retrieve all the providers that are enabled for the customer.
In dual-site selection, on searching for a site, the user would be provided with two different options for the site (if the site has implemented Open Banking). Currently, only Current accounts would be supported via Open Banking and all the other account types would be aggregated using the user's banking credentials. The selection would then decide the aggregation mechanism.
Step 2: Generate Consent
Call the POST /consents endpoint to post the providerId and create the consentId. The response also includes the account data to which the user will be providing consent to share and along with the scope or data clusters associated with the provider. The data can then be displayed to the user.
Step 3: Update Consent
Pass the scopeId in the PUT /consents/{consentId} endpoint and in a browser launch the authorizationUrl present in the response.
Step 4: Add the Site
Once the user completes the authorisation procedure, obtain the authorizationCode present in the redirect URL. To link the user’s account with the OB provider site in the Yodlee system, pass the authorizationCode in the POST /providerAccounts endpoint.
Creating a Consent Dashboard
Using Yodlee APIs, customers can create a dynamic consent dashboard that enables their users to manage their consents (i.e., view, renew, and revoke). A summary of all the consents along with the permission status and data access period can be displayed in the dashboard.
Retrieving Consents
The existing set of consents that a user has provided can be displayed in the consent dashboard by calling the following endpoint:
- GET /consents – Retrieve all consents.
- GET /consents?providerAccountIds={} – Retrieve consents for a specific provider.
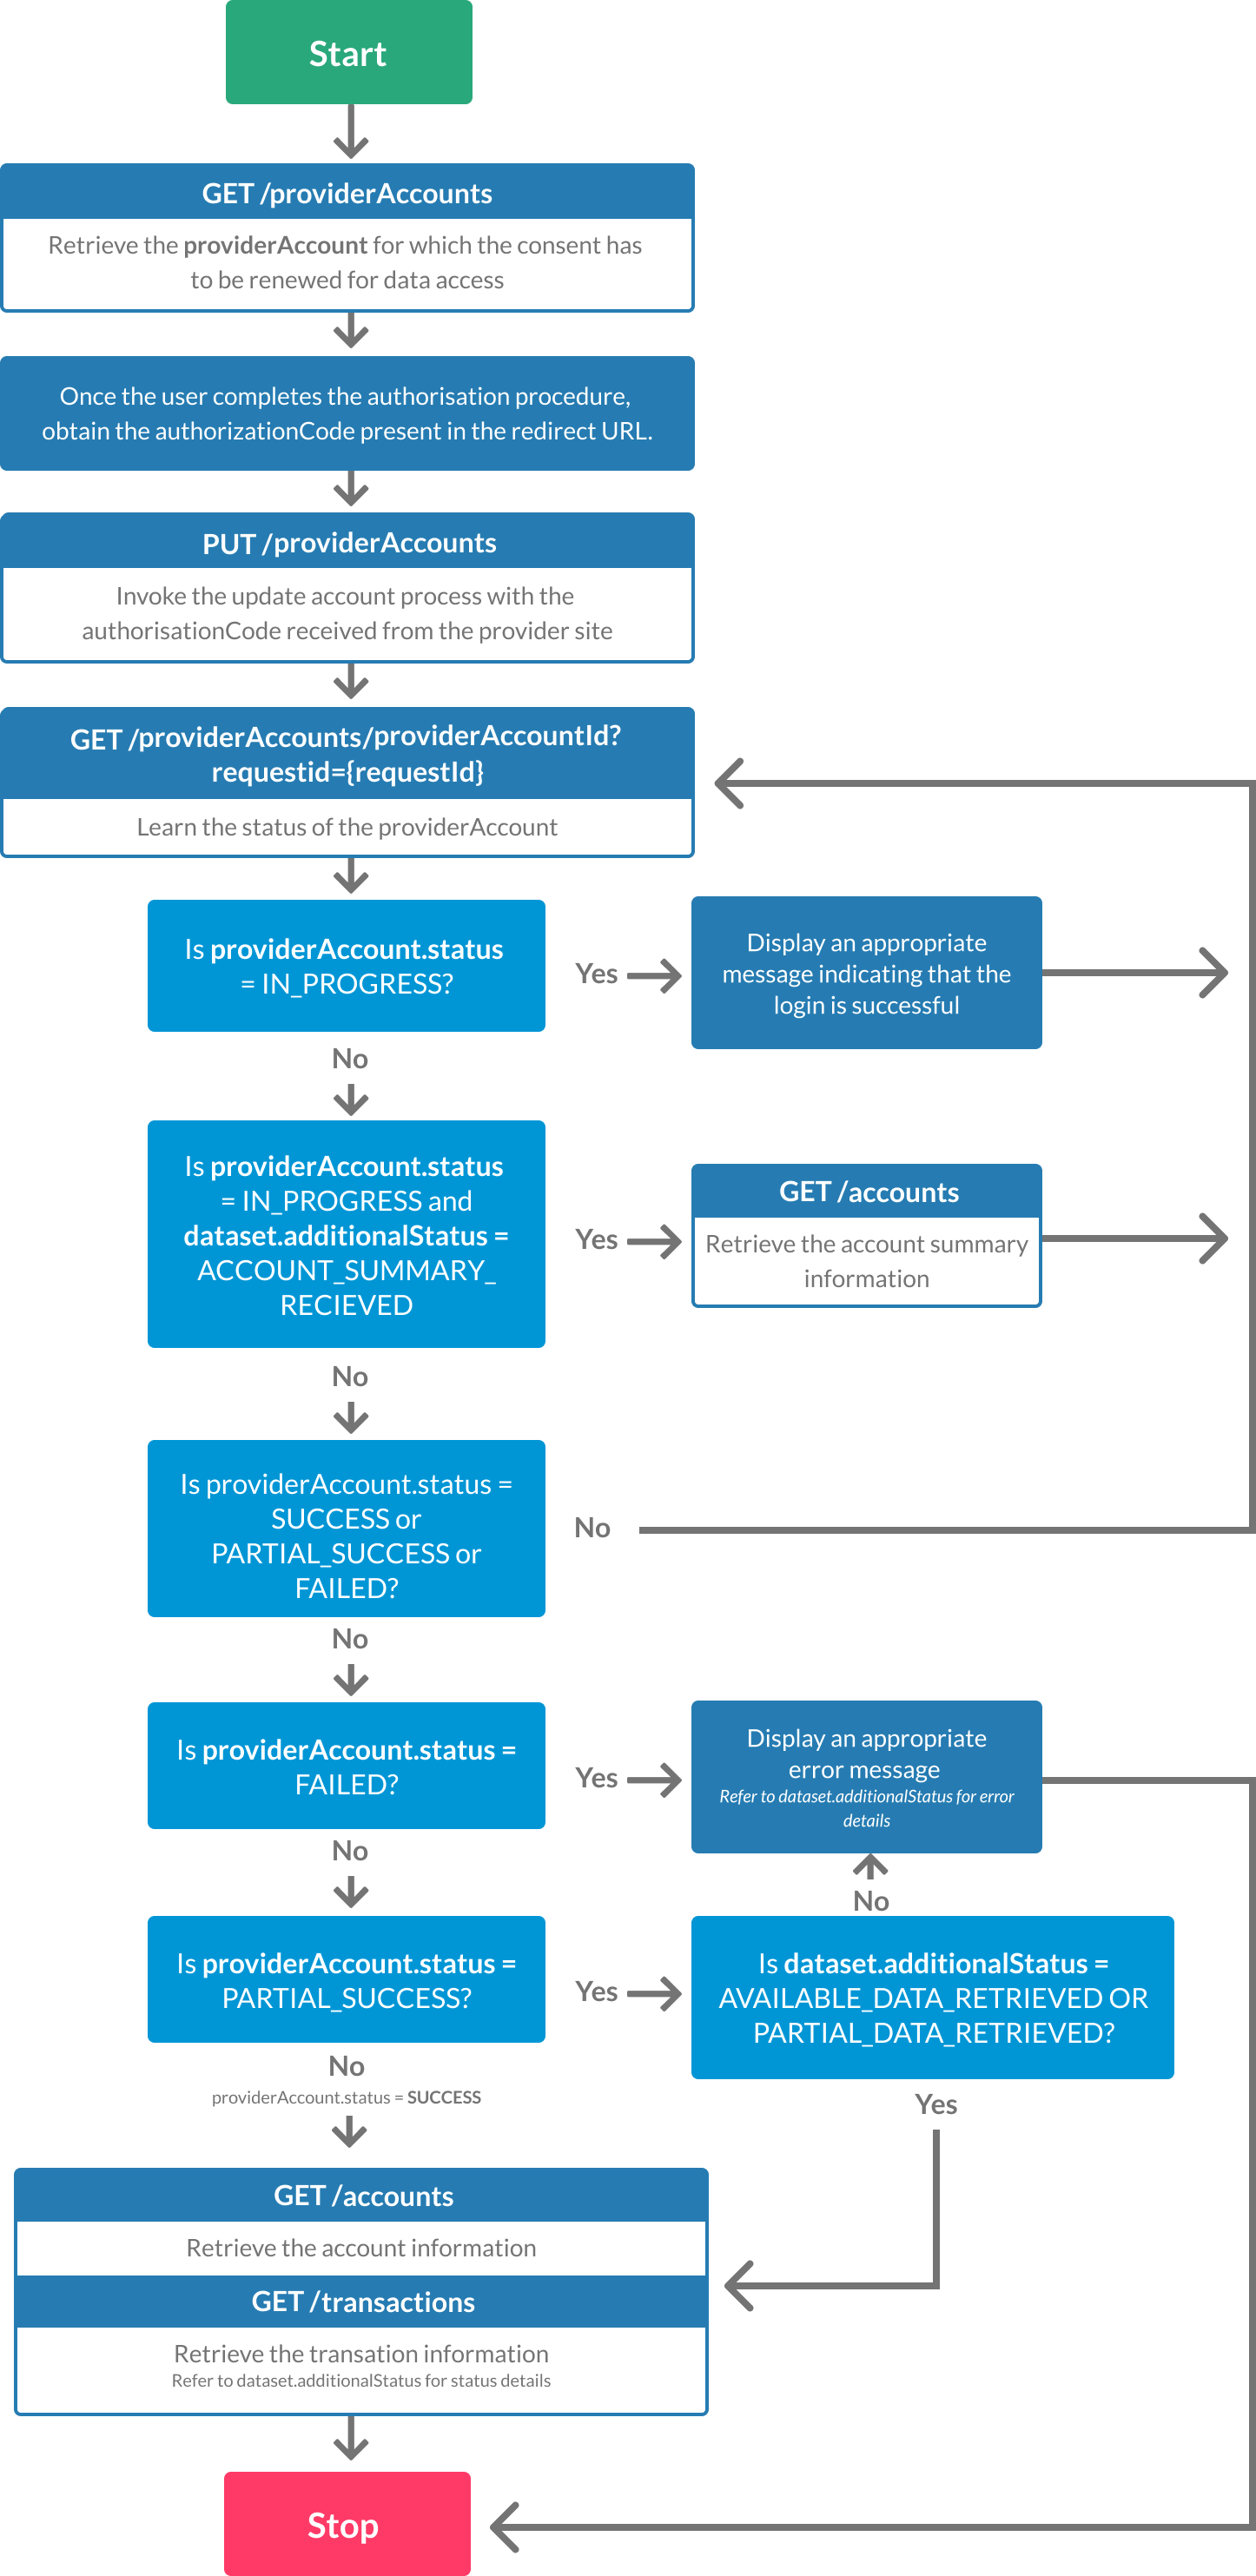
Renewing Consent to Share Data
After successfully linking OB sites, users will be asked to renew their consent periodically. By default, the frequency to renew is 90 days. For example, a user can choose to renew consent, if the selected account has changed at the site or the consent is about to expire.
Step 1: Retrieve the Authorization URL
Call the GET /consents/{consentId} endpoint and launch the authorizationUrl present in the response in a browser. Prompt the user to renew the consent.
Step 2: Update the Consent
Once the user completes the renewal process, obtain the authorizationCode present in the redirect URL.
To capture the renewed consent for the provider in the Yodlee system, call the PUT /providerAccounts endpoint. Pass the providerAccountIds in the path param and the consentId and authorizationCode in the body param to update the provider account with renewed consent.
Revoking Consent to Share Data
Call the DELETE /providerAccounts/{providerAccountId} endpoint to delete the provider account and revoke the consent.
Best Practices
- Recommend the users to renew the consent before it expires.
- Pass datasets while calling the POST /consents endpoint only if the default dataset configuration needs to be changed.
- Once the
consentIdis generated using the POST /consents endpoint, link it to a providerAccountId for that user. If not done, you will get the sameconsentIdfor the user and provider combination. - If the user is editing a consent for an existing providerAccount, always call the PUT /providerAccounts endpoint with the updated
consentId. Calling the POST /providerAccounts endpoint with the sameconsentIdwill throw an invalid value for consent ID
Testing Using the Forgerock Site
- Search for the Forgerock site using the GET /institutions or the GET /providers
- Pass the
consentIdin the PUT /consents/{consentId} endpoint with the scopeId. - Launch the Forgerock
authorizationUrlpresent in the response in a browser. - Enter the following Forgerock credentials and click Sign in:
User Name: yodemo
Password: yoDemo@19 - Select accounts and click Proceed to provide consent.
- Obtain the
authorizationCodepresent in the redirect URL and pass it in the POST /providerAccounts endpoint along with theconsentId. - Call the GET /accounts endpoint to fetch the account summary information.
API Flow
Click to view the Add Provider Account Flow.
Click to view the Consent Renewal/Update Provider Account Flow.
Glossary
| Term | Description and Examples |
|---|---|
| Dual Site | From an API perspective, the dual site refers to the implementation wherein two separate API calls must be made to link OB and non-OB sites. |
| Single Site Selection | Unlike dual sites, in single site selection, the search results are retrieved at a financial institution-level. Which means that a GET call results in separate calls for OB and non-OB sites. |
| PSD2 | The revised Payment Service Directive, which intends to end the monopoly of banks and financial institutions by enabling their customers to use third-party providers to manage their finances. |
| AISP | Account Information Service Providers (AISP) are the service providers with access to the account information of bank customers. |
| Consent | Consent is merely permission given by users to the third-party providers (TPP) to access and manage their account data. |
| Provider Account | In Yodlee's context, a provider account is referred to as a site or a financial institution's accounts. |
| FCA Approval | An approval is given by the Financial Conduct Authority (FCA) to the TPPs if they meet the regulatory requirements. |
| Migration | Internal to Yodlee, migration refers to the movement of users from the credential-based sites to the OB sites enabling them to adapt to OB standards. |